Run a Deep Investigation
A deep investigation that forms multiple hypotheses and validates each one with evidence. You'll trigger it from chat and configure it in response plans. Learn more → Deep Investigation. Time: ~10 minutes.
Prerequisites
- An Azure SRE Agent in Running state
- At least one connected data source (Azure Monitor, Application Insights, or a custom connector)
- Permissions to chat with your agent
Mode 1: Deep investigation from chat
Use this mode when you want to investigate a specific question with structured reasoning — whether it's a live issue, a performance concern, or a complex question about your environment.
Step 1: Enable deep investigation
In your agent's chat, click the + button in the bottom-left of the chat input area. This opens the configuration menu.
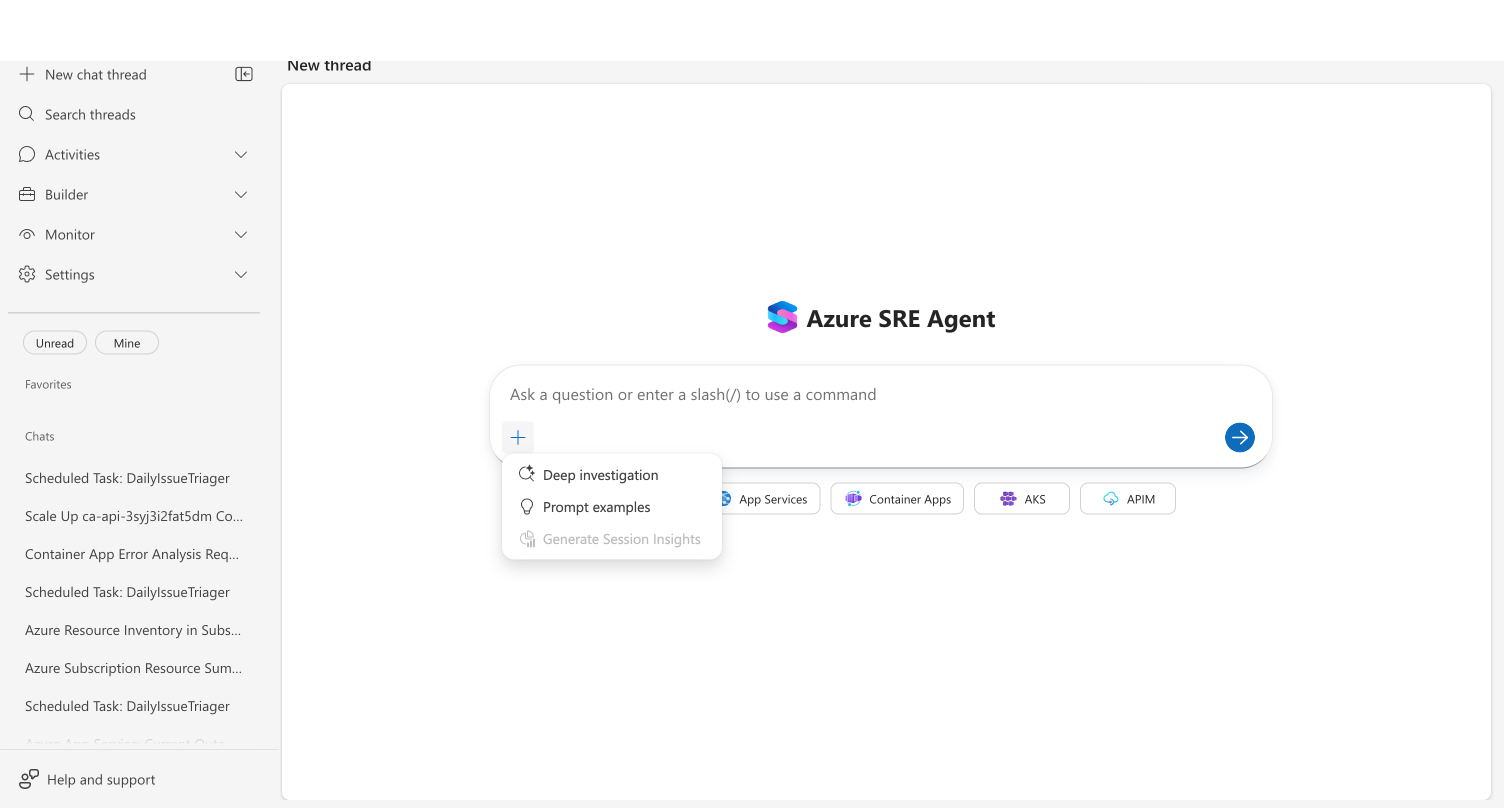
Select Deep investigation from the menu.
If this is your first time, a confirmation dialog appears explaining that deep investigations query multiple data sources and take several minutes. Click Yes to continue.
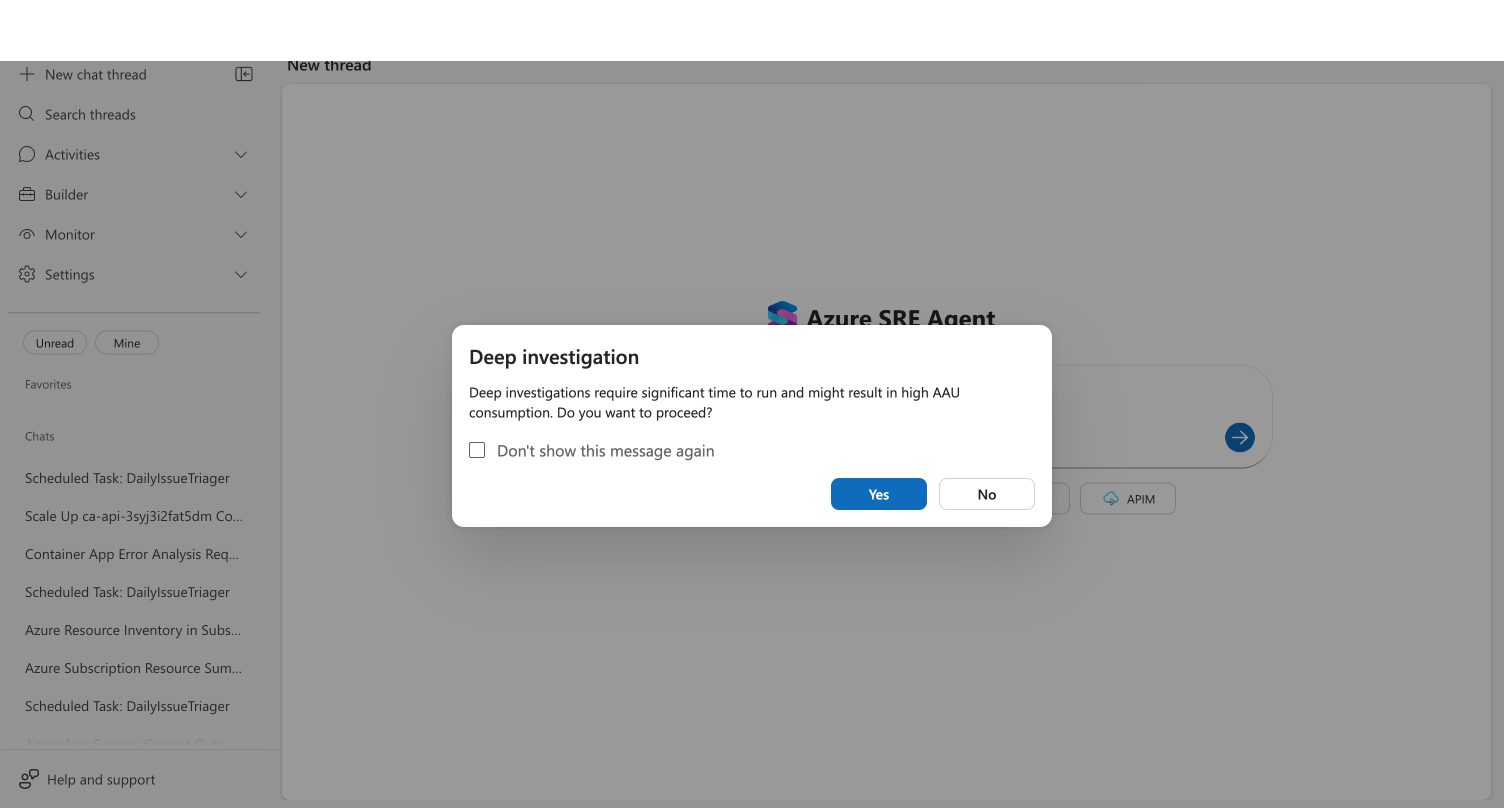
Check "Don't show this message again" if you plan to use deep investigation regularly. You can always toggle it off by clicking the X on the deep investigation badge.
Step 2: Confirm deep investigation is active
After confirming, you'll see two indicators:
- A status message at the top of the chat: "Deep investigation is turned on" with a sparkle icon
- A sparkle badge next to the + button in the chat footer, with an X to dismiss
Step 3: Ask your question
Type a question that benefits from structured investigation. Good candidates include:
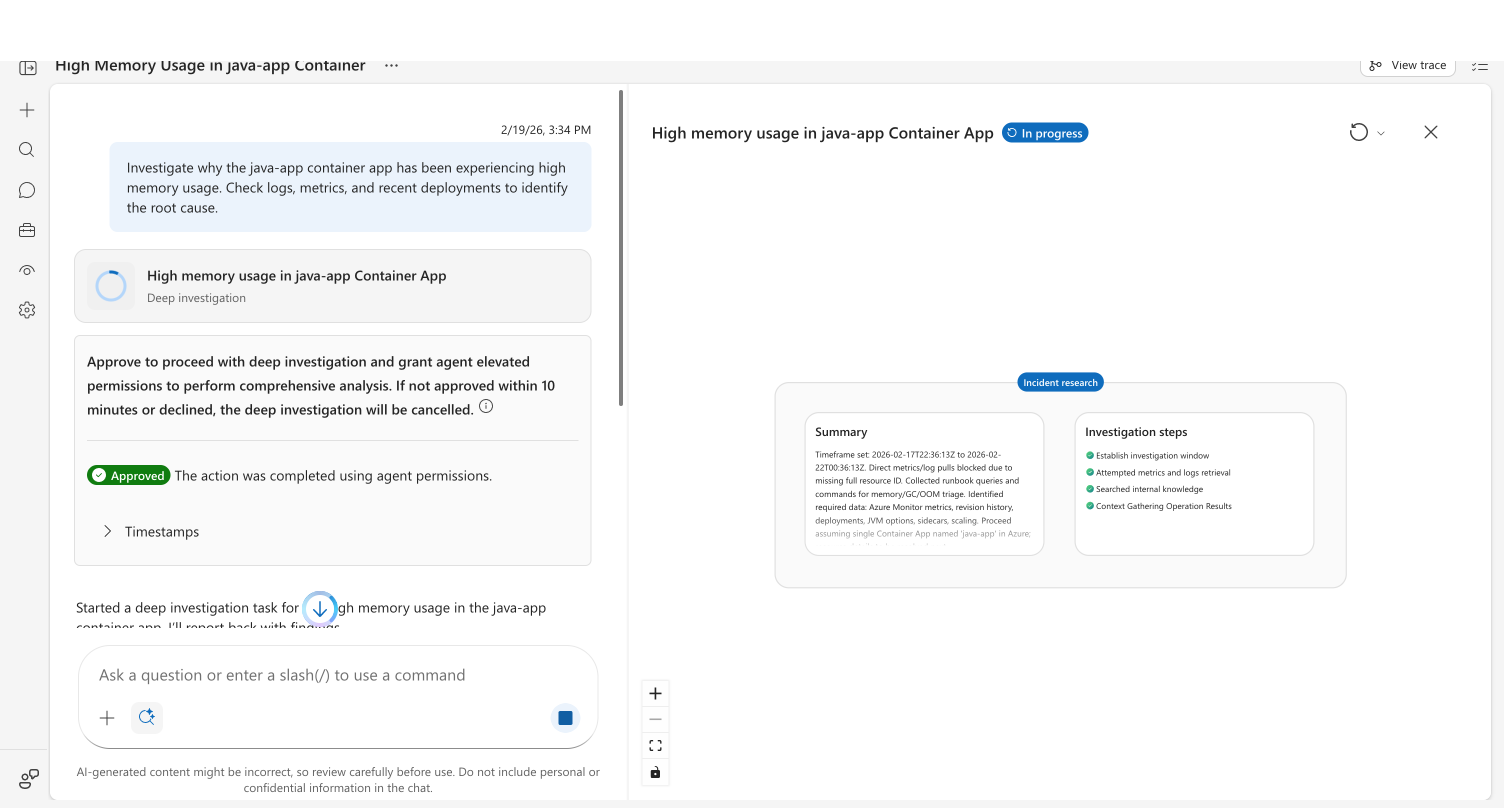
Investigate why the java-app container app has high memory usage.
Check logs, metrics, and recent deployments to identify the root cause.
Why are API response times for the payment service degraded since yesterday?

Our AKS cluster nodes keep scaling up. Investigate what's driving the resource pressure.

Correlate the recent deployment with the spike in 500 errors on the orders endpoint.
Click Send (or press Enter).
Step 4: Approve the authorization
For chat-triggered investigations, your agent requests authorization before proceeding. An authorization card appears in the chat with two options:
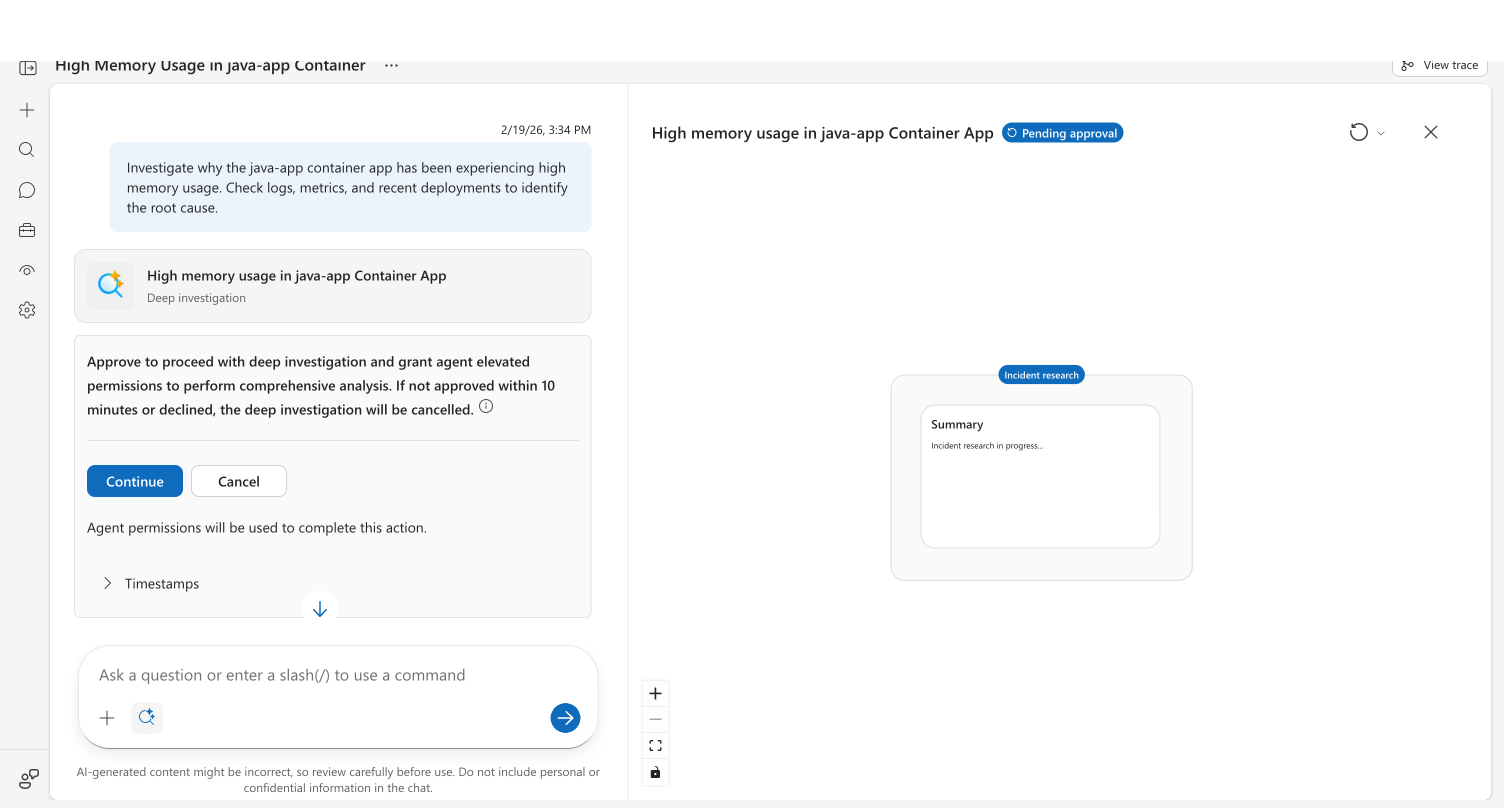
- Continue — Approve the investigation and grant your agent elevated permissions to query your Azure resources
- Cancel — Decline the investigation; your agent falls back to a standard response
If you don't respond within 10 minutes, the investigation cancels automatically and your agent proceeds with a standard investigation.
Click Continue to approve. The card updates to show a green Approved checkmark.
Step 5: Watch the investigation progress
The investigation detail panel opens on the right side of the chat, showing a live visualization of your agent's work.
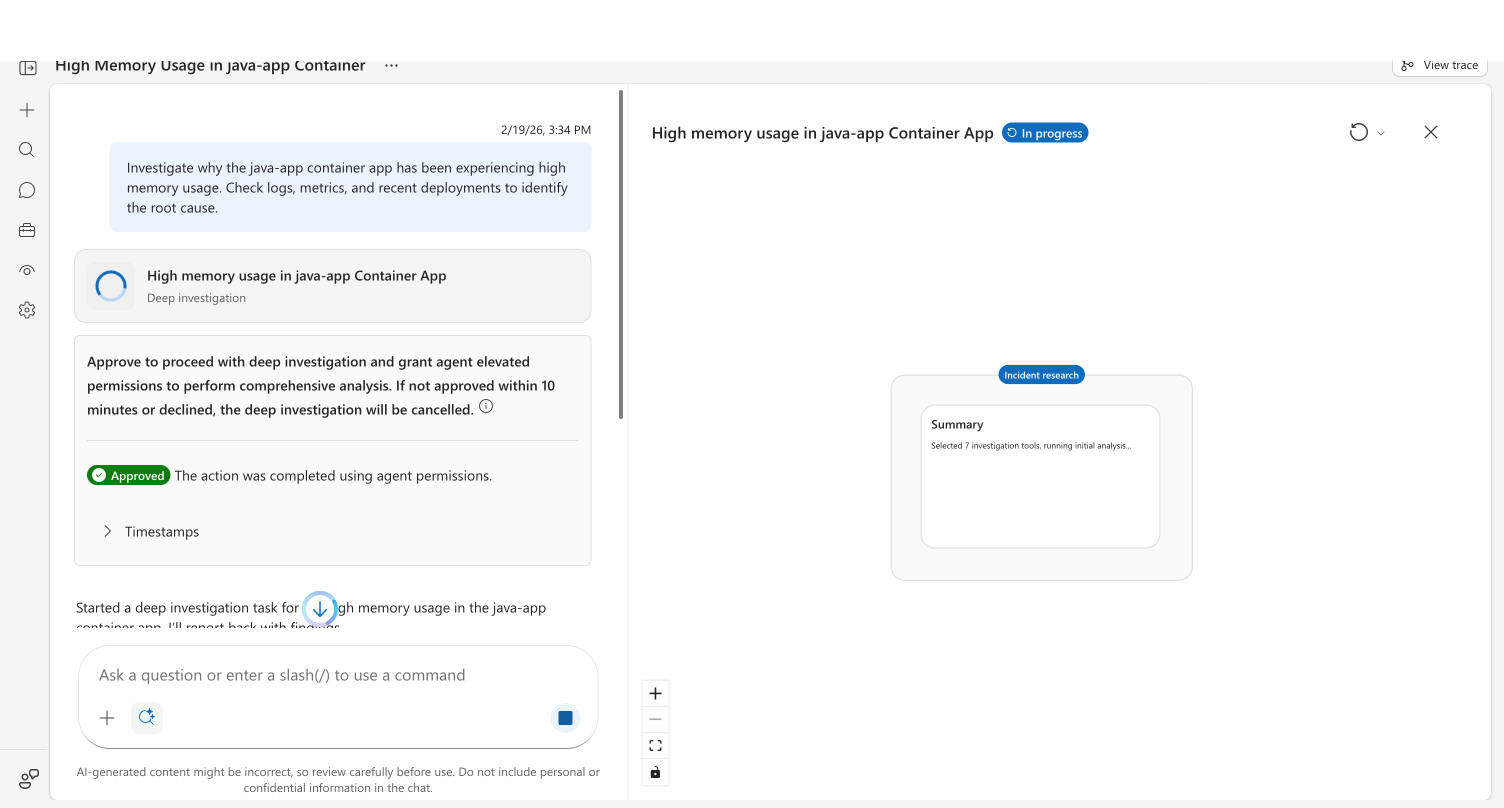
Phase 1 — Incident research: Your agent selects investigation tools and gathers context. The summary card shows what data was collected and the investigation steps completed.
Phase 2 — Forming hypotheses: Based on the gathered context, your agent generates 2–4 hypotheses about potential root causes. Each hypothesis card shows a title and brief description.

Phase 3 — Validating hypotheses: Your agent tests each hypothesis in parallel (up to three at once). Status pills update as validation completes:
| Status | Color | Meaning |
|---|---|---|
| Validating | Blue | Currently being tested |
| Validated | Green | Evidence supports this hypothesis |
| Invalidated | Red | Evidence rules this out |
| Inconclusive | Yellow | Not enough evidence to confirm or rule out |
Validated hypotheses at shallow levels can generate sub-hypotheses (up to 3 levels deep), creating a branching tree of investigation paths.
Phase 4 — Conclusion: Your agent synthesizes findings into a structured conclusion. The conclusion node at the bottom of the tree summarizes the root cause with supporting evidence and recommended actions.
Click any node in the hypothesis tree to open the details panel. This shows the full investigation summary, validation steps, evidence collected, and reasoning — everything your agent considered during that phase.
Step 6: Turn off deep investigation
Deep investigation mode stays active for subsequent messages. To turn it off:
- Click the X on the sparkle badge next to the + button, or
- Click + and deselect Deep investigation
A status message confirms: "Deep investigation is turned off."
Mode 2: Deep investigation from incident response plans
For incidents that warrant thorough analysis automatically — production outages, critical severity alerts — configure deep investigation in your response plans.
Step 1: Navigate to response plans
Go to Builder → Incident response plans in the portal sidebar.
Step 2: Create or edit a response plan
Create a new response plan or edit an existing one. In the handler configuration:
- Set the Priority to the severity levels you want (e.g., P1, P2)
- Enable the Deep investigation toggle in the investigation settings
Step 3: Save the response plan
When an incident matches the response plan criteria, your agent automatically starts a deep investigation — no approval required.
Incident-triggered deep investigations use the agent's managed identity permissions, not your personal identity. Make sure your agent's managed identity has the necessary roles (Reader or Monitoring Reader) on the resources you want investigated.
Cancelling a deep investigation
If the investigation is no longer needed:
| Method | When to use | How |
|---|---|---|
| Stop button | Investigation is running | Click the blue Stop button in the chat footer |
| Cancel authorization | Agent is waiting for approval | Click Cancel on the authorization card |
| Let it timeout | You forgot to respond | After 10 minutes, the authorization expires automatically |
Partial results are always preserved. Click the investigation card in your chat to view whatever was completed before cancellation.
Checkpoint: verify it worked
After your deep investigation completes:
- The investigation card in chat shows a green checkmark with status Complete
- The hypothesis tree shows at least one Validated or Inconclusive hypothesis
- A Conclusion node appears at the bottom of the tree with recommended actions
- Clicking any hypothesis node opens a detail panel with evidence and validation steps
What you learned
- Deep investigation applies structured, hypothesis-driven reasoning to complex problems
- Chat mode requires authorization and uses your identity for Azure resource access
- Response plan mode runs automatically without approval using the agent's managed identity
- The hypothesis tree shows every path explored — validated, invalidated, and inconclusive
- You can cancel at any time without losing partial results
Related
| Resource | What you'll learn |
|---|---|
| Deep Investigation → | Full capability reference and how it works |
| Incident Response Plans → | Set up automated response plans |
| Connectors → | Connect more data sources |
| Agent Reasoning → | How your agent reasons through problems |