Setting Up ServiceNow
A connection to your ServiceNow instance so your agent can automatically index and investigate ServiceNow incidents. Learn more → ServiceNow Incident Indexing. Time: ~10 minutes.
Prerequisites
- An Azure SRE Agent in Running state
- A ServiceNow instance with the Incident table (standard ITSM)
- A ServiceNow user account with itil or admin role (for Basic auth), or a registered OAuth Application (for OAuth)
- Contributor role or higher on the SRE Agent resource
Step 1: Open Incident platform
- Navigate to sre.azure.com and select your agent
- In the sidebar, expand Builder
- Click Incident platform
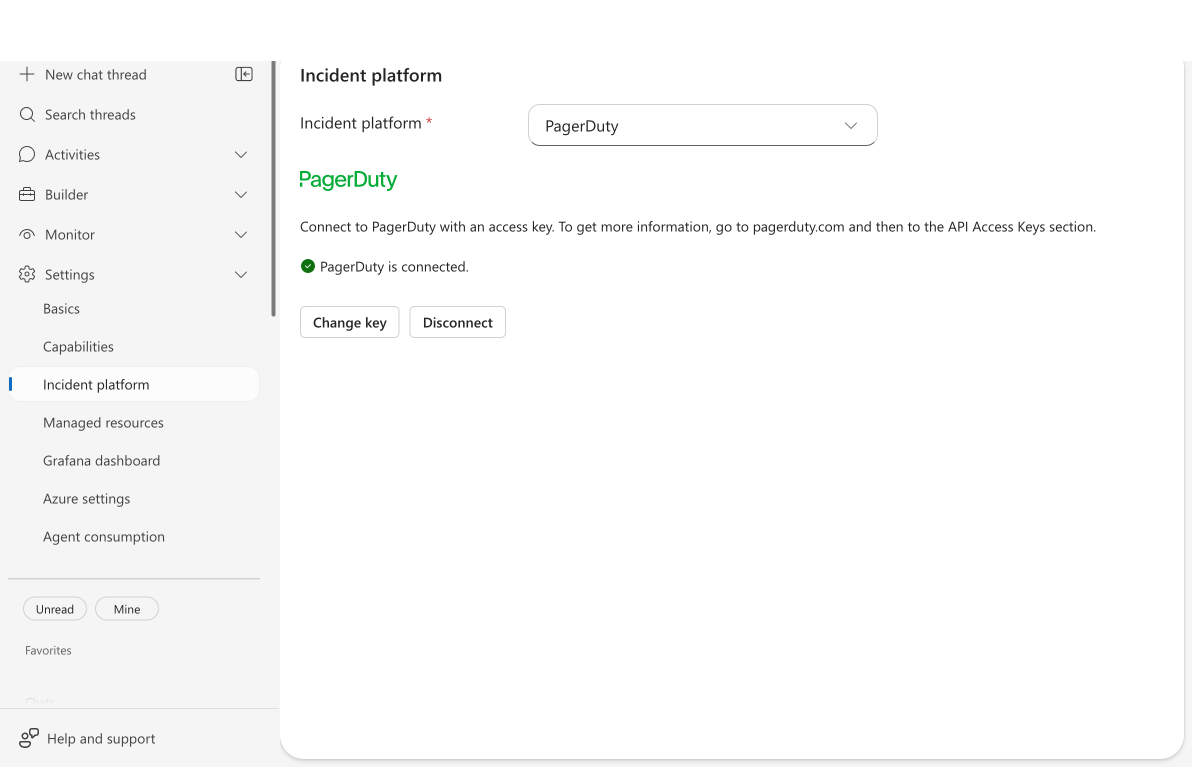
Checkpoint: You see the "Incident platform" heading with a platform dropdown.
Step 2: Select ServiceNow
- Click the Incident platform dropdown
- Select ServiceNow
If another platform is already connected, you'll be prompted to disconnect it first. The agent can connect to one incident platform at a time.
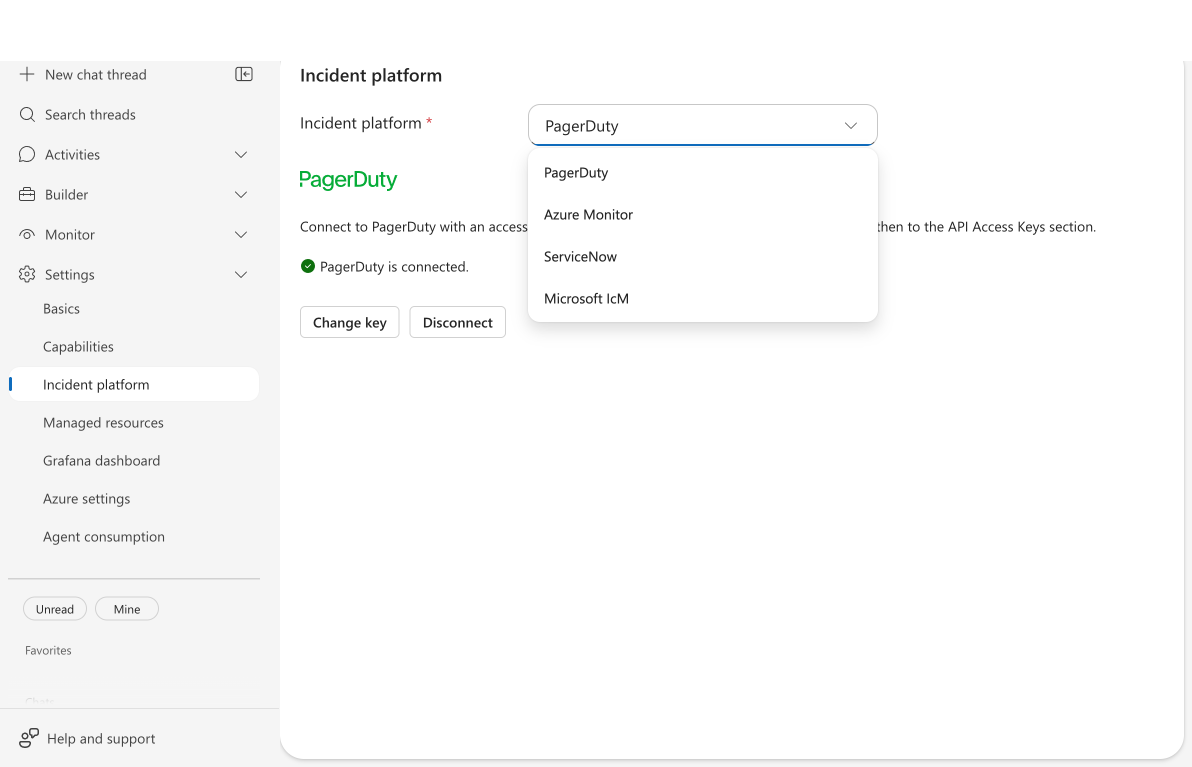
Checkpoint: The ServiceNow form appears with authentication fields.
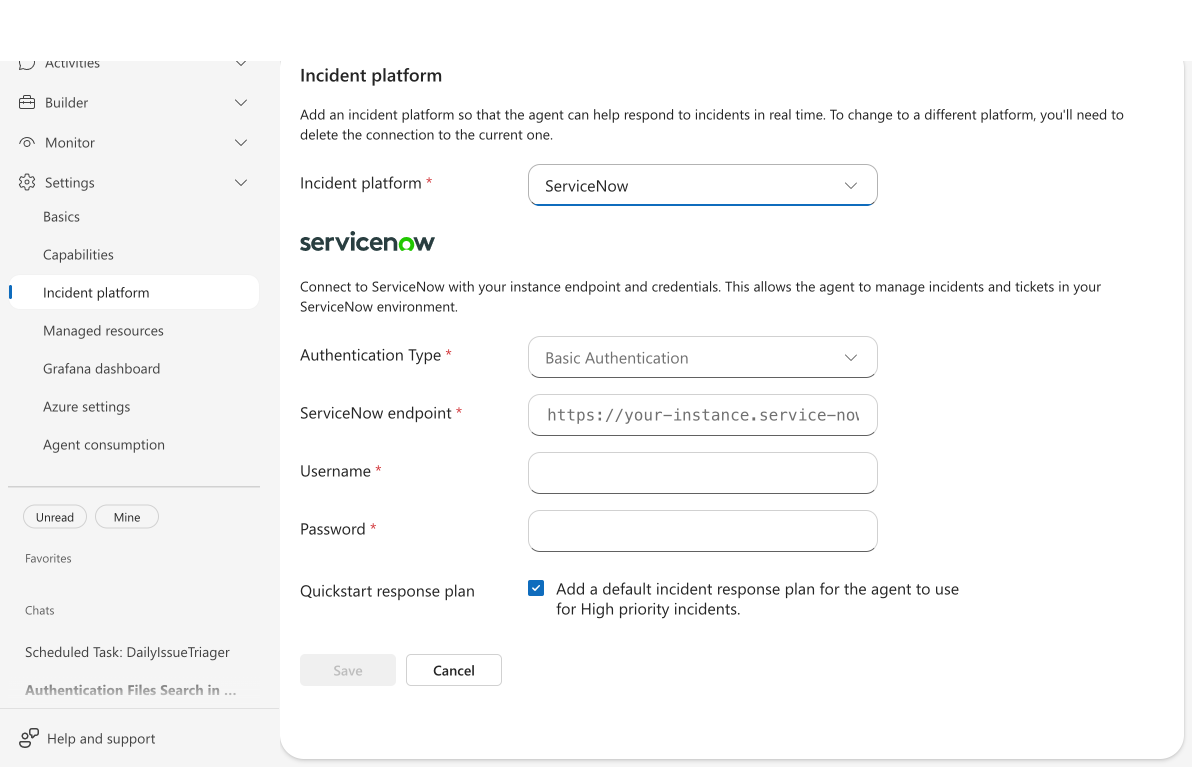
Step 3: Choose authentication and enter credentials
Select your authentication type from the Authentication Type dropdown.
Option A: Basic Authentication
- Leave Authentication Type set to Basic Authentication
- Enter your ServiceNow endpoint (e.g.,
https://your-instance.service-now.com) - Enter your Username
- Enter your Password
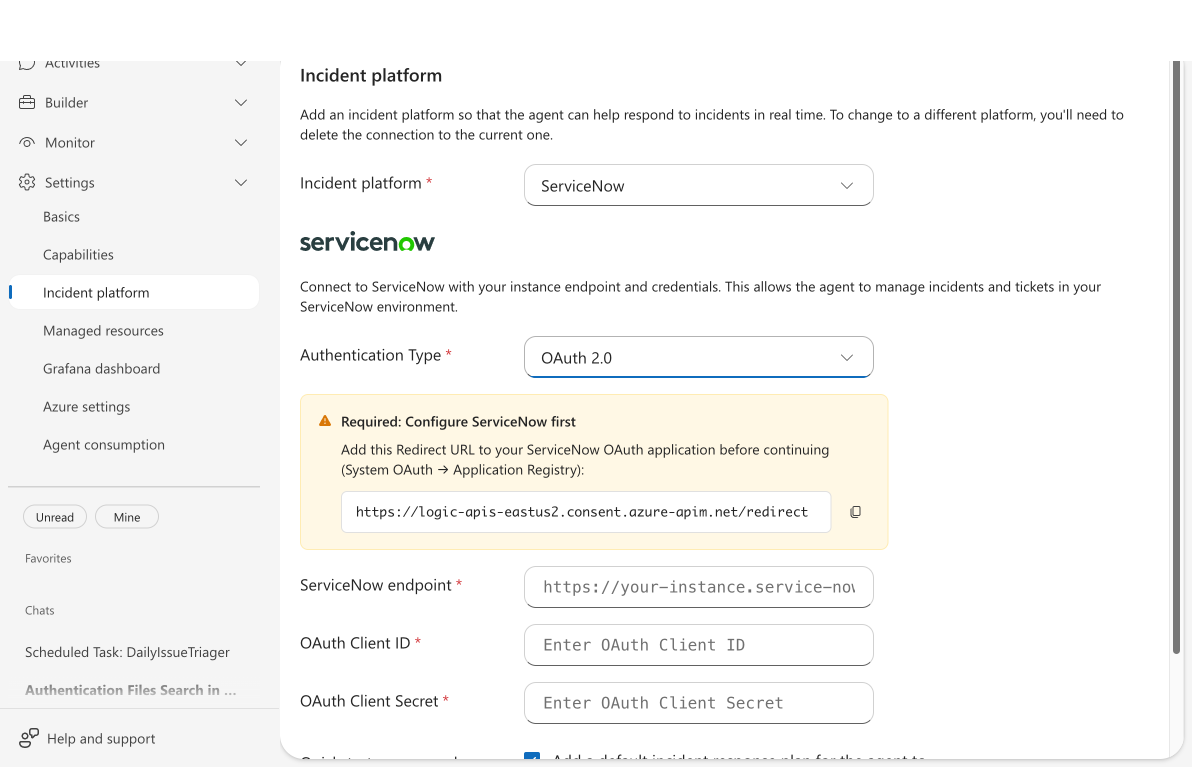
Option B: OAuth 2.0
- Select OAuth 2.0 from the Authentication Type dropdown
- Note the Redirect URL shown in the info box — you need to register this in ServiceNow first
- Enter your ServiceNow endpoint
- Enter your OAuth Client ID
- Enter your OAuth Client Secret
Before authorizing, add the redirect URL to your ServiceNow OAuth application:
- In ServiceNow, go to System OAuth → Application Registry
- Open or create your OAuth application
- Add the redirect URL:
https://logic-apis-{region}.consent.azure-apim.net/redirect(The exact URL with your agent's region is shown in the portal)
Checkpoint: All required fields are filled. The Save button (Basic) or Authorize button (OAuth) becomes active.
Step 4: Connect and validate
For Basic Authentication: Click Save. The connection settings are saved and the agent begins checking connectivity to ServiceNow in the background.
For OAuth 2.0: Click Authorize. A popup window opens for you to complete the OAuth flow in ServiceNow. After authorization, the connection is established.
Watch the connectivity indicator — it polls every few seconds and typically confirms the connection within 30 seconds to 2 minutes. The check works by fetching a real incident from your ServiceNow instance to verify the credentials are valid.
If you see "Unable to connect to ServiceNow":
- Verify your endpoint URL is correct (include
https://) - Confirm the username and password are valid
- Check that the account has the
itilrole - Ensure your ServiceNow instance allows REST API access
Checkpoint: The connectivity indicator shows a green "Connected" status.
Step 5: Review quickstart response plan
The Quickstart response plan checkbox is enabled by default. This creates a default response plan that handles High priority incidents automatically. The agent needs at least one response plan before it starts scanning for incidents — if you uncheck this, no incidents are indexed until you create a response plan manually.
To customize incident handling later, go to Activities → Incidents to create additional response plans with specific priority routing and run modes.
Step 6: Verify incidents appear
- In the sidebar, expand Activities
- Click Incidents
- Wait 1–2 minutes for the scanner to complete its first cycle
ServiceNow incidents appear in the overview grid.
Checkpoint: ServiceNow incidents appear with columns for ID, Title, Priority, Status, Agent Status, Created, Owning Service, and Handler.
Edit or disconnect ServiceNow
Edit connection settings
- Go to Builder → Incident platform
- Click Edit at the bottom of the page
- Modify the instance URL, credentials, or other settings
- Click Save
Disconnect ServiceNow
- Go to Builder → Incident platform
- Click Disconnect at the bottom of the page
- A confirmation dialog appears — click Yes to confirm
After disconnecting, the agent stops scanning for ServiceNow incidents. Your response plans are preserved and reactivate when you reconnect.
Update incident fields during investigations (Preview)
This feature is in preview. Functionality and behavior may change before general availability.
Once your ServiceNow connection is active, your agent can update incident fields directly during investigations. In an incident investigation thread, ask the agent to update fields like assignment group, category, impact, or priority — the agent handles the ServiceNow API call.
Try it: In an incident investigation thread, ask:
"Update this incident's category to 'Network' and subcategory to 'DNS'"
The agent updates the fields directly in ServiceNow and confirms the changes.
Supported fields: assignment_group, category, subcategory, impact, urgency, priority, short_description, and custom fields (u_* prefix like u_environment).
Priority values: Use string values — "1" (Critical), "2" (High), "3" (Moderate), "4" (Low), "5" (Planning).
Use ServiceNow's snake_case field names (for example, assignment_group, not Assignment Group). The agent handles the mapping automatically when you describe the field in natural language.
State changes use dedicated actions — the update action does not change incident state. To acknowledge or resolve incidents, ask the agent directly (for example, "acknowledge this incident" or "resolve this incident").
What you learned
- How to connect ServiceNow with Basic or OAuth 2.0 authentication
- How connectivity validation catches credential issues during setup
- How the quickstart response plan automates handling for High priority incidents
- Where to view indexed incidents under Activities → Incidents
- How to update incident fields directly from the agent conversation
Troubleshooting
| Issue | Solution |
|---|---|
| "Unable to connect to ServiceNow" | Verify endpoint URL, username/password, and that the account has itil role |
| No incidents appear after connecting | Ensure the Quickstart response plan checkbox was checked during setup. The agent requires at least one response plan to start scanning. |
| OAuth authorization popup fails | Ensure the redirect URL is registered in ServiceNow's OAuth Application Registry |
| Connectivity indicator stays "waiting" | Allow up to 2 minutes. If it times out, recheck your credentials |
| Need to switch from another platform | Disconnect the current platform first — the agent connects to one platform at a time |
Related
| Resource | What you'll learn |
|---|---|
| ServiceNow Incident Indexing → | How ServiceNow incident indexing works and why it matters |
| Incident Response Plans → | Create response plans to route different priorities to different run modes |
| Incident Response → | How your agent investigates and responds to incidents |