Upload Knowledge Documents
A runbook captured from a real investigation, a manually uploaded document, and verification that your agent retrieves both in future conversations. Learn more → Upload Knowledge Documents.
Prerequisites
- An Azure SRE Agent in Running state
- Write permissions on the agent
- Agent run mode set to Review or Autonomous
Step 1: Start from an investigation
The best knowledge documents come from real investigations. Instead of creating content from scratch, you'll capture what your agent already learned.
- Go to sre.azure.com and select your agent
- In the left sidebar under Chats, find a previous investigation thread — any conversation where your agent diagnosed or resolved an issue — and click on it
If you don't have an investigation thread yet, start a new chat and ask your agent to investigate something:
Investigate high memory usage on our container apps
Wait for the investigation to complete, then continue with Step 2.
Step 2: Ask your agent to create a runbook
In the same investigation thread, ask your agent to turn its findings into a runbook and save it to Knowledge settings. Be specific about the filename.
Create a runbook from the investigation we just did. Include the root cause
analysis, the diagnostic steps, mitigations, and escalation triggers.
Save it to Knowledge settings as high-memory-runbook.md
Your agent:
- Synthesizes the investigation context into a structured runbook
- Generates sections like Root Cause Analysis, Diagnostic Steps, Mitigations, and Escalation Triggers
- Saves the document to Knowledge settings and confirms the upload
The agent confirms the document was saved with a success message. Your runbook is now stored in Knowledge settings and will be indexed for search.
Checkpoint
- Agent generated a structured runbook from the investigation
- Agent confirmed the document was saved
Step 3: Verify in Knowledge settings
- In the left sidebar, click Builder to expand the section
- Click Knowledge settings
The Knowledge settings page displays your documents in a table with columns for File Name, Status, Type, and Last modified. The Status column shows ✓ Indexed when the document is indexed and ready for search.
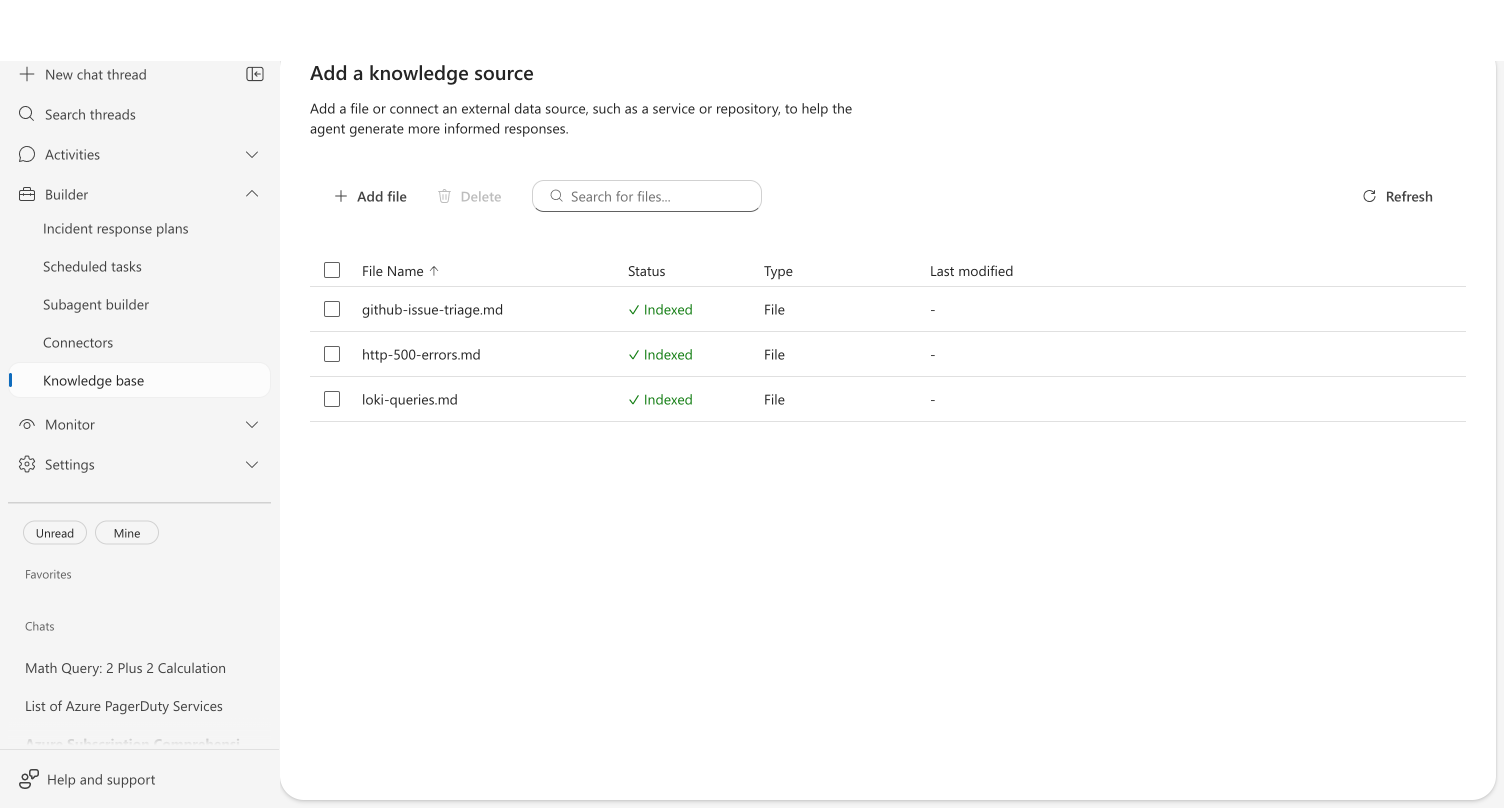
If the status shows Pending, click Refresh — indexing typically completes within a few seconds.
Checkpoint
- Navigated to Builder → Knowledge settings
- Document appears with ✓ Indexed status
Step 4: Upload a file through the portal
You can also upload files directly — useful for existing runbooks, documentation, or reference materials your team already has.
- On the Knowledge settings page, click Add file
- Drag a file into the drop zone, or click Browse to select one
The Browse button filters to .md and .txt files. To upload other supported formats (.pdf, .docx, .csv, .json, images, and more), drag and drop the file into the upload area instead.
- Click Add file to upload
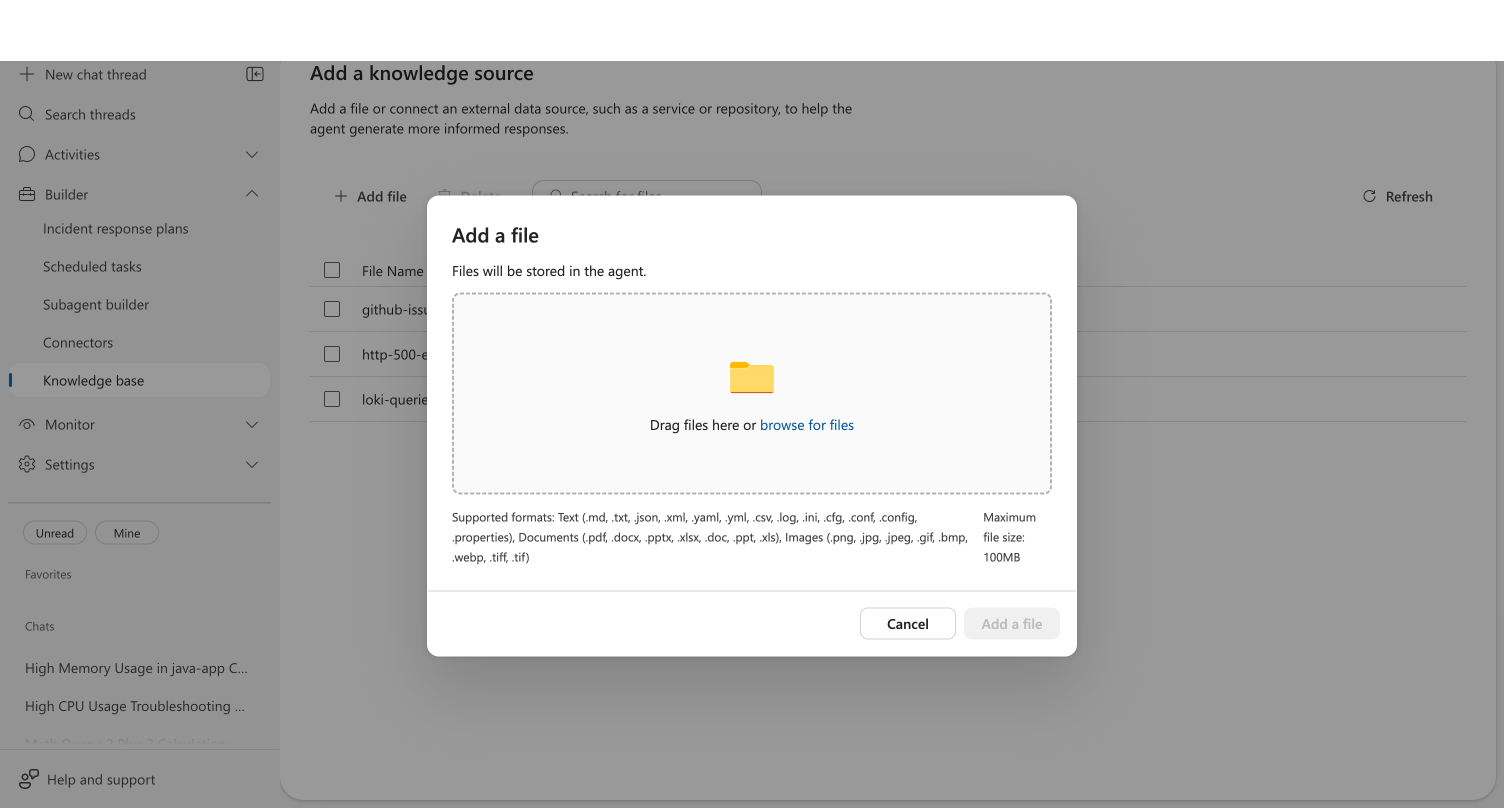
The portal accepts many file types for Knowledge settings including text files, documents, and images. For the complete list of supported extensions and size limits, see the Upload Knowledge Documents capability page.
Maximum file size is 16 MB per file, with up to 100 MB per upload.
Checkpoint
- Clicked Add file and saw the upload dialog
- Uploaded a file successfully
- File appears in Knowledge settings with ✓ Indexed status
Step 5: Test retrieval in a new conversation
Start a new chat thread and ask a question that your uploaded documents should answer:
What are the steps for troubleshooting high memory usage on container apps?
Your agent searches Knowledge settings, finds your uploaded runbook, and references it in the response. This confirms the knowledge is indexed and retrievable.
Checkpoint
- Started a new chat thread
- Asked a question related to the uploaded content
- Agent referenced the uploaded document in its response
Going further
Delete a knowledge document
- Go to Builder → Knowledge settings
- In the documents list, select one or more documents using the checkboxes
- Click Delete in the toolbar
- A confirmation dialog lists the documents to be removed — click Delete to confirm
Deleted documents are removed from the agent's Knowledge settings and no longer appear in search results.
Knowledge documents cannot be edited in place. To update a document, upload a new version with the same filename — it replaces the previous version.
What you learned
- Your agent can turn real investigations into structured runbooks and save them to Knowledge settings
- You can upload files manually through the portal UI in Builder → Knowledge settings — supporting many formats including PDF, Office documents, and images
- Uploaded documents are indexed for semantic search and available in all future conversations
- Documents can be updated by uploading with the same filename
Troubleshooting
| Error | Cause | Fix |
|---|---|---|
| "Agent memory is disabled. Cannot upload documents." | Knowledge settings not enabled on your agent | Contact your administrator to enable Knowledge settings |
| "I don't have write access to your Knowledge settings" | Agent couldn't locate the upload tool | Rephrase your request: "Save it to Knowledge settings as filename.md" |
| "Invalid file extension. Only .md and .txt files are allowed." | Filename doesn't end in .md or .txt (chat upload) | Use a .md or .txt extension when asking the agent to save |
| "Document content exceeds maximum size of 16MB" | Content too large for a single document | Split into multiple smaller documents |
| "File name cannot be empty" | No filename provided | Include a filename in your prompt (e.g., runbook.md) |
Related
| Resource | What you'll learn |
|---|---|
| Upload Knowledge Documents → | How this works and why it matters |
| Create a Skill → | Build procedural skills that complement knowledge documents |
| Skills → | How skills and knowledge work together |
| Connect Knowledge Sources → | Connect live wiki content as a knowledge source |