Step 1: Create and Set Up Your Azure SRE Agent
Deploy an Azure SRE Agent, connect your code repository, and add Azure resource access.
What you'll accomplish
- Deploy an Azure SRE Agent to your subscription
- Connect your GitHub code repository
- Grant the agent Reader access to your Azure resources
Prerequisites
| Requirement | Details |
|---|---|
| Azure subscription | An active Azure subscription with permission to create resources |
| Role | Contributor on the subscription (needed to register resource providers and create resources). If your team assigns managed resource groups with RBAC, you also need Owner or User Access Administrator to create role assignments. |
| Network access | *.azuresre.ai must be reachable from your browser |
Open the onboarding wizard
- Navigate to sre.azure.com.
- Sign in with your Azure credentials.
- The wizard opens with a three-step flow: Basics → Review → Deploy.
Basics
Fill in the fields to define your agent:
| Field | Description | Example |
|---|---|---|
| Subscription | The Azure subscription that will own the agent resource | My Production Subscription |
| Resource group | An existing resource group or create a new one | rg-sre-agent |
| Agent name | A unique name for your agent instance | contoso-sre-agent |
| Region | Azure region for deployment | East US 2 |
| Model provider | Choose the AI model provider for your agent | See provider table below |
| Application Insights | Create a new instance or use an existing one | Create new (default) |
After you select a region, the Model provider field appears. Choose the AI provider that powers your agent's investigations and conversations:
Organizations with EU data residency requirements should select Azure OpenAI — Anthropic is excluded from EU Data Boundary (EUDB) commitments. Anthropic (Claude) models require a direct Anthropic agreement and are not available to all tenants.
| Provider | Description |
|---|---|
| Anthropic | Claude models — marked Preferred for most regions |
| Azure OpenAI | GPT models — covered by EU Data Boundary commitments for Sweden Central deployments |
Anthropic is selected by default for most regions. For Sweden Central, Azure OpenAI is selected by default. You can change the model provider after creation in Settings → Basics.

Click Next to proceed.
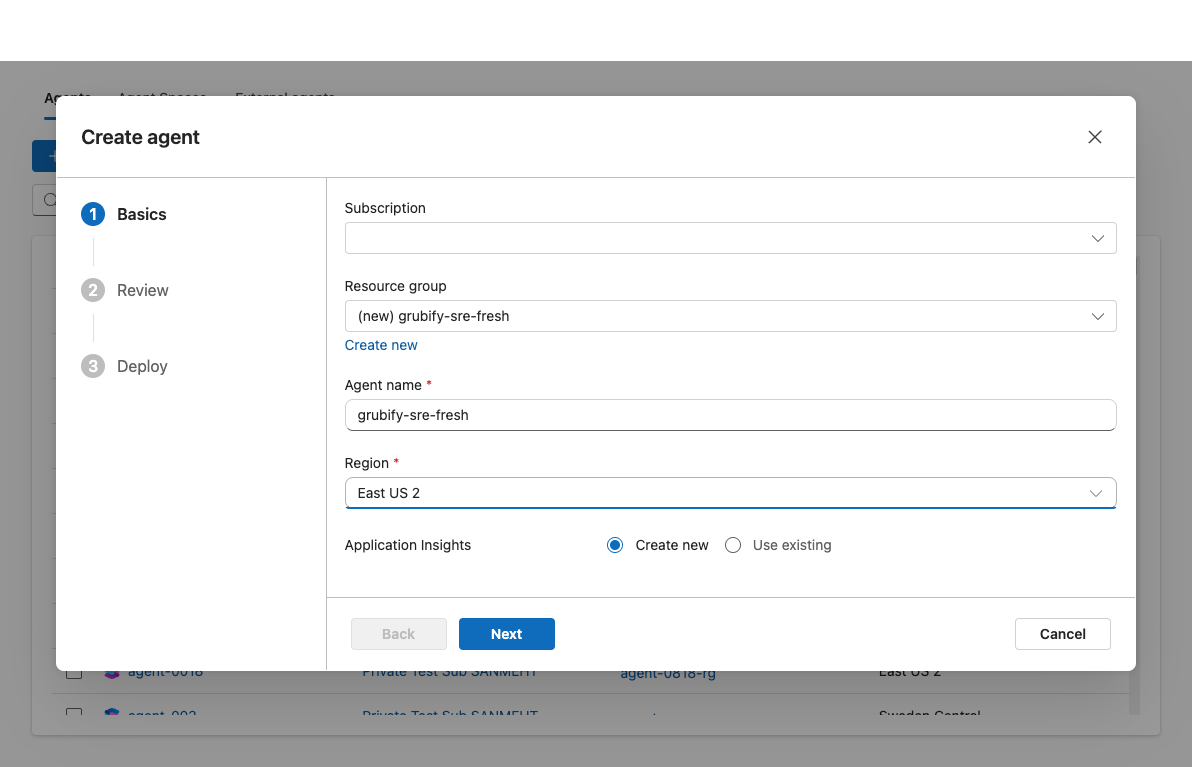
Checkpoint: All fields are filled, including the model provider. The Next button is enabled.
Review
The wizard shows a summary of your configuration. Verify:
- Subscription and resource group are correct.
- Agent name and region match your intent.
Click Create to begin provisioning.
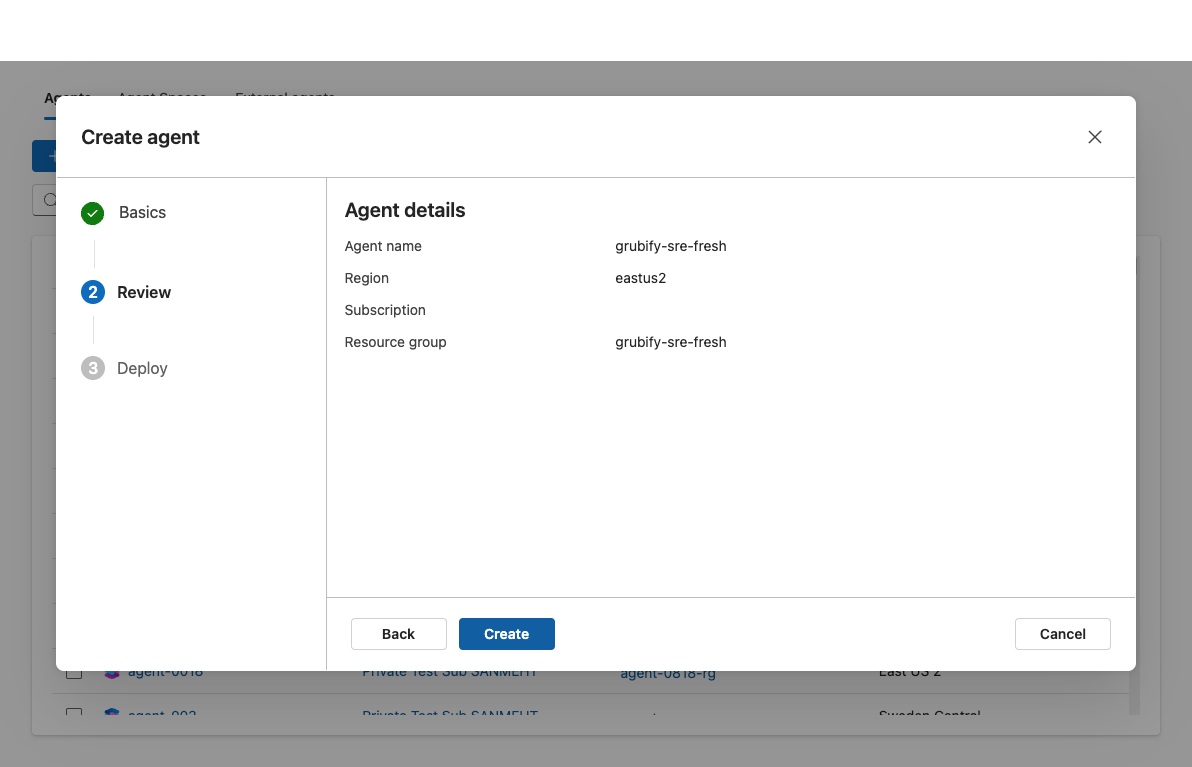
Checkpoint: The summary matches what you entered. No validation errors appear.
Deploy
The deployment creates the following Azure resources:
| Resource | Purpose |
|---|---|
| Managed Identity | Authenticates the agent to Azure services |
| Log Analytics Workspace | Stores agent telemetry and diagnostic logs |
| Application Insights | Monitors agent health and performance |
| Role Assignments | Grants the managed identity required access |
| Azure SRE Agent resource | The agent itself |
If you selected Create new for Application Insights, the deployment also creates an Application Insights instance and Log Analytics Workspace.
Wait for the deployment to complete. This typically takes 2–5 minutes.
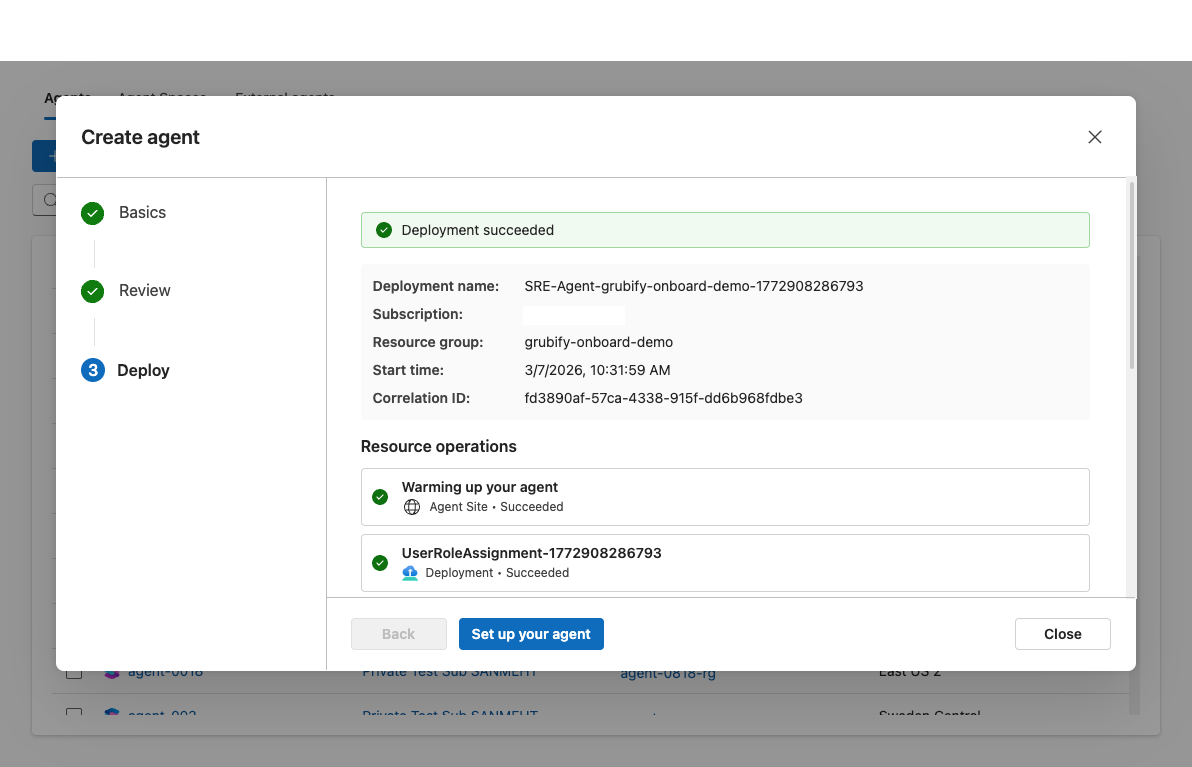
Checkpoint: Deployment status shows Succeeded. All resources are listed as created.
Set up your agent
After deployment finishes, click Set up your agent to open the setup page. You'll see the header "More context. Better investigations." This page has two tabs:
| Tab | Data sources |
|---|---|
| Quickstart | Code, Logs, Deployments, Incidents |
| Full setup | Everything in Quickstart + Azure Resources + Knowledge Files |
Start with the Quickstart tab. Not all sources are required — but connecting more gives your agent better context for investigations. This guide walks through connecting code and logs (from Quickstart) and Azure resources (from Full setup).
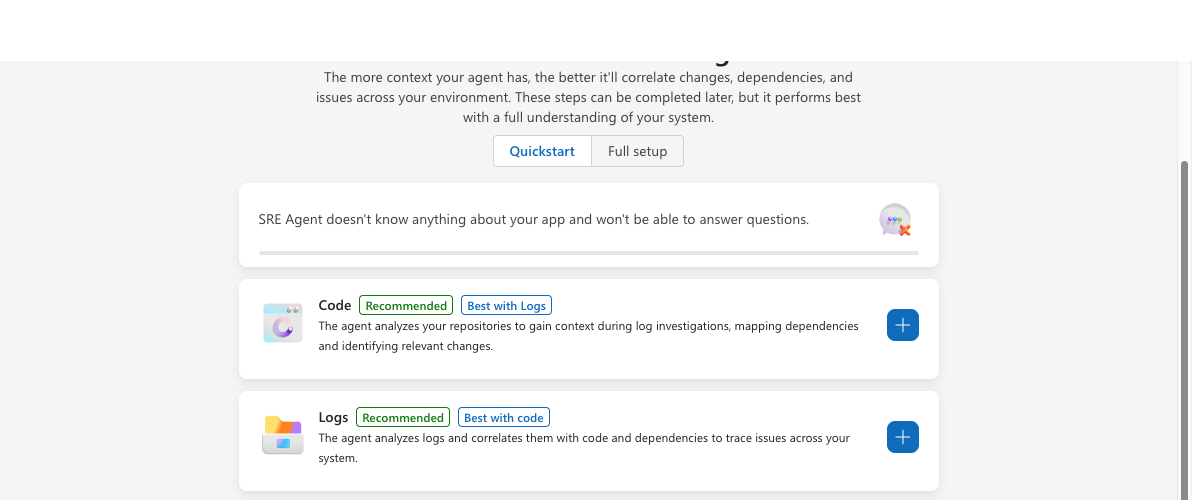
Connect your code repository
- On the Code card, click the + button to connect repositories.
- Choose a platform: Select GitHub (Azure DevOps is also supported).
- Choose sign in method: Select Auth or PAT.
- Auth: Click Sign in, authenticate in the browser, and approve access when prompted.
- PAT: Paste your Personal Access Token and click Connect.
- Click Next to proceed to repository selection.
- Pick repositories: Use the dropdown to select one or more repositories — they're listed alphabetically for easy browsing.
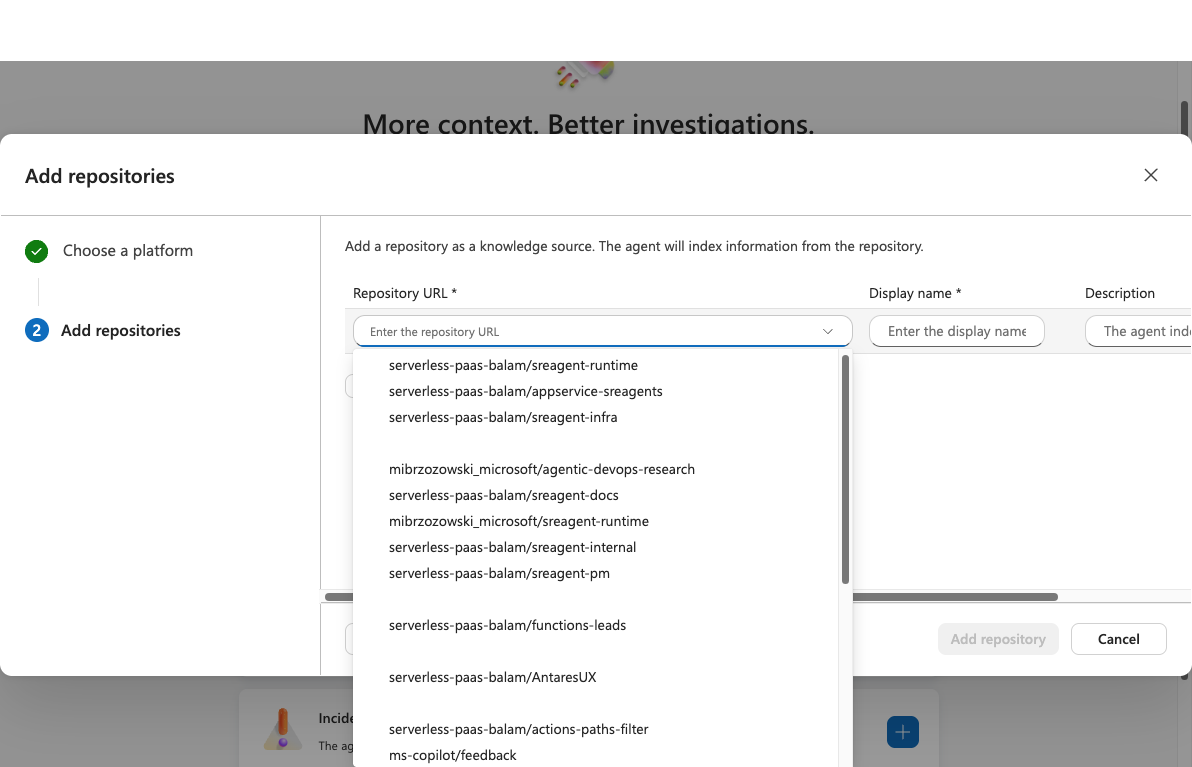
- Click Add repository.
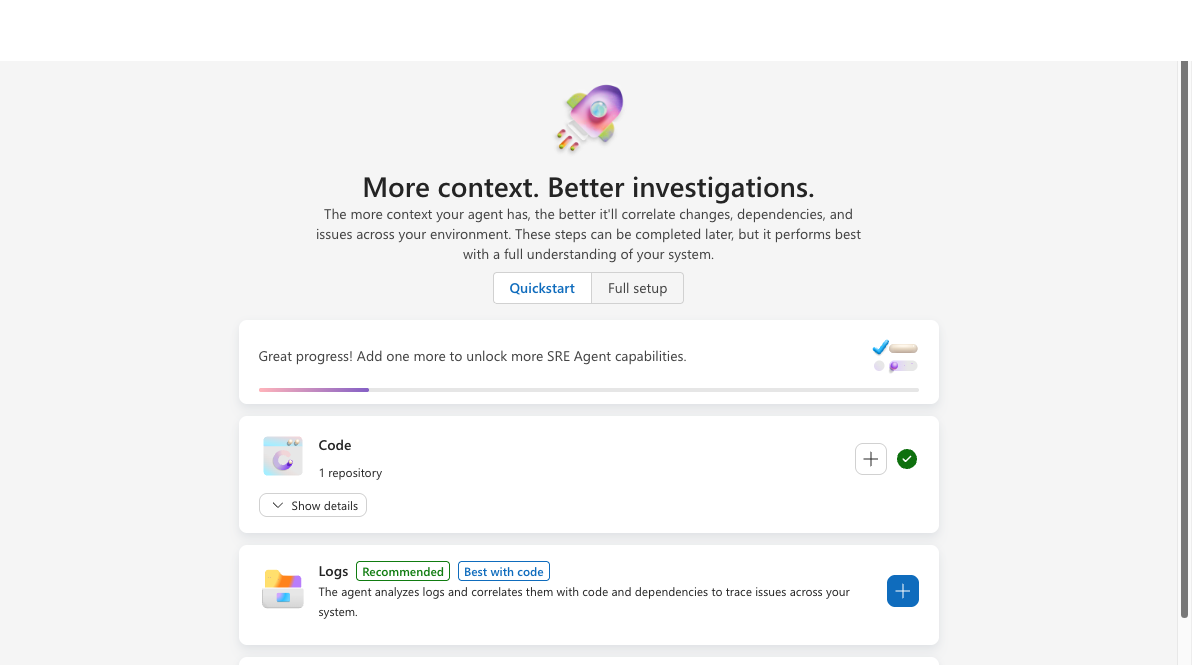
Checkpoint: The Code card shows a green checkmark and lists the connected repositories.
Connect the repository that contains the service you'll investigate first. Once connected, your agent immediately starts exploring the codebase and building expertise — learning your project structure, deployment configurations, and code patterns through Deep Context.
Connect your logs
Connecting log sources gives your agent access to production telemetry — error traces, performance metrics, and application health data. Combined with source code, this lets your agent correlate production issues with code changes during investigations.
The setup page marks Logs as Recommended and Best with code — connecting both gives your agent the full picture from day one.
- On the Logs card, click the + button.
- The Configure logging provider dialog opens with three steps.
- In Step 1: Choose a logging provider, select a log source:
| Log source | What it provides |
|---|---|
| Log Analytics Workspace | Query logs, discover tables, check activity logs, and monitor metrics across your Log Analytics workspaces. Read-only. |
| Application Insights | Query application telemetry, trace requests, analyze dependencies, and monitor performance metrics. Read-only. |
If you don't see the connector you need, use the search bar at the top of the dialog to find it. Additional log sources include Azure Data Explorer (Kusto), Datadog, Splunk, Elasticsearch, Dynatrace, and New Relic.
- Click Next to proceed to Step 2: Set up logging provider.
- Fill in the required fields:
| Field | Description |
|---|---|
| Name | A descriptive name for this connector (e.g., prod-logs) |
| Log Analytics Workspace or Application Insights | Select the resource from the dropdown — it lists resources from your Azure subscriptions |
| Managed Identity | The agent's managed identity (pre-selected) |
- Click Next to review, then click Add connector.
Checkpoint: The Logs card shows a green checkmark and lists your connected log source.
Verify log access
Ask your agent about a recent issue:
Check for any errors in the last 24 hours
Your agent queries the connected log source and returns results.
The agent's managed identity needs Log Analytics Reader and Monitoring Reader roles on the resource group containing your Log Analytics workspace or Application Insights resource. These are assigned automatically when you save the connector.
You can add multiple log sources — for example, connect both a Log Analytics workspace for infrastructure logs and an Application Insights resource for application telemetry. For the full list of supported log sources and how your agent uses them during investigations, see Azure Observability and External Observability.
Add Azure resource access
Granting the agent access to your Azure resources allows it to query metrics, logs, and resource configurations during investigations. The permission level you choose determines which RBAC roles are assigned (see Permissions for details). Connector-specific roles like Log Analytics Reader and Monitoring Reader are assigned separately when you save a connector.
- On the setup page, switch to the Full setup tab (or use the Azure Resources card if visible on Quickstart).
- On the Azure Resources card, click the + button to add resources.
- Choose resource type: Select Subscriptions or Resource groups, then click Next.
If you chose Subscriptions:
- Select subscriptions: Use the search box to find subscriptions. Check the ones you want the agent to access.
- Click Next to review agent permissions.
- The agent's managed identity is automatically granted Reader role on each selected subscription. Review the permissions status.
- Click Add subscriptions.
If you chose Resource groups:
- Filter by subscription: Use the subscription dropdown to filter which resource groups are shown.
- Select resource groups: Use the search box to find resource groups. Check the ones you want the agent to access. The grid shows the resource group name, subscription, and region.
- Click Next to review agent permissions.
- Choose the permission level for the agent, and review the role assignments.
- Click Add resource group.
Checkpoint: The Azure Resources card shows the connected subscriptions or resource groups.
After you add subscriptions or resource groups, the agent automatically assigns the required permissions to its managed identity. This can take a few seconds — you'll see the status update on the permissions review step. Reader role provides read-only access. For advanced permission management, see Manage permissions and access.
Click "Done and go to agent"
Once you've connected your data sources, click Done and go to agent. This takes you into the agent chat to start team onboarding.
Checkpoint: The agent chat opens.
Related capabilities
| Capability | What it adds |
|---|---|
| Connectors | How the agent connects to external data sources |
| User Roles | Who can access your agent and what they can do |
| Permissions | How permission levels and RBAC roles work |